Baconsdozen imperial tools.
Using one of the DIY type brake pipe flaring tools.
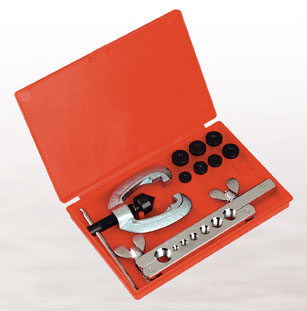
The DIY hand held flaring kits (below) are suitable for copper (kunifer) based brake tubing only.They are hand held or can be mounted in a vice, they will not flare mild steel pipe,but given the speed at which steel pipe rusts it is a waste of time using it unless originality on a classic of collectors car is a must.If you really want to use steel pipe you'll need a heavy duty or hydraulic pipe flarer.
Preparation.
Squirting the nipples and brake pipe unions a day or so before with releasing fluid might help and don't forget to buy some brake fluid.If possible remove the brake filler cap and refit with thin polythene under it to reduce fluid loss.Get all your flare nut spanners and tools ready,check if you need imperial or metric tools remove the road wheel and if possible clamp any flexible pipes to save as much leakage as possible.Make sure the bleed nipple will move,if it doesn't or breaks off,budget for a replacement brake cylinder.Generally with old rusted brake pipes,it's as easy to snap them off close to the fitting and use a ring spanner to remove the securing nuts.The nuts should be renewed but retain all the bits of brake pipe to cut the replacement to the right length.
Using the flaring tools.
The pipe must be cut square (preferably with a tube cutter) and be free of burs internally, and don't forget to place the flare nut on the pipe.I found for normal 3/16 O.D brake pipe it was best to leave about 3/16 inch protruding from the face of the holder.The wing nuts should be done up tightly to grip the pipe and the former (or die) placed in the end.When forming the flare check the assembly is kept square and use a smear of brake fluid as a lubricant.This should form a single flare.To form a double flare then use the pointed end of the ram screw with brake fluid as a lubricant to press down the centre of the flare.
If the flare appears OK fit it without fully tightening it,remove and check that it seems to be fitting OK.Check carefully for leaks after final assembly.It makes sense to experiment a few times with scrap pieces of brake pipe to gain confidence.
Brake bleeding.
As a general rule when bleeding brakes on older cars start at the wheel the greatest distance from the master cylinder and work back,ending with the closest wheel.I have used vacuum and pressure bleeders but still find the old bit of clear plastic pipe (to see the bubbles) and a jam jar method works for me.Always tighten bleed nipples with the pedal held down..For vehicles with split braking systems and those with two or more nipples on the calipers it makes sense to follow a workshop manual or handbook to find the correct sequence.
Baconsdozen sell imperial tools for older,classic or vintage cars and motorcycles.