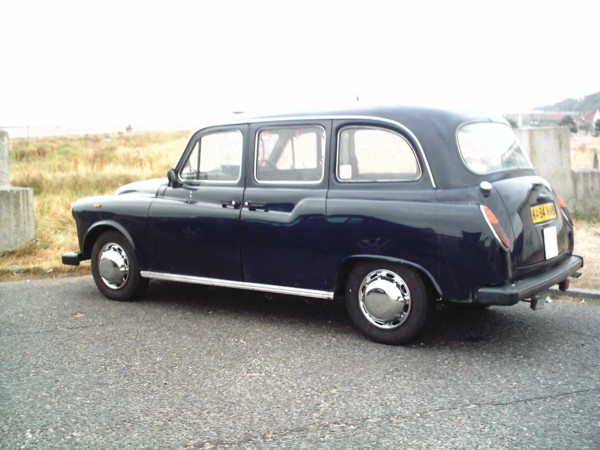
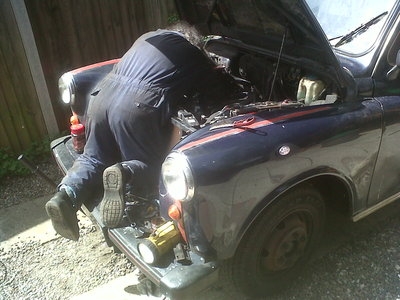
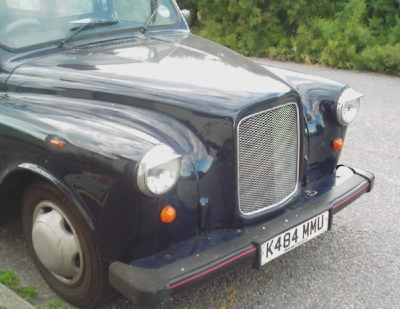
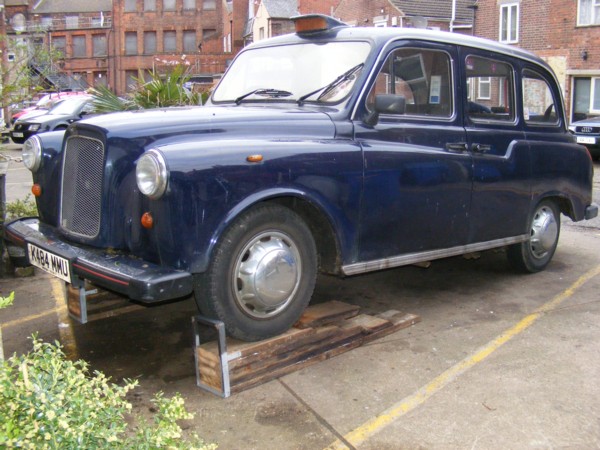
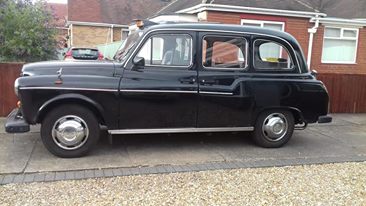
My first Fairway Driver (ex London black taxi cab).
By Baconsdozen Imperial Tools
Using a retired black cab as a daily runabout,workhorse and as a classic car.Facebook group is here.
Probably the most recognisable vehicles in the world,these Fairway taxi cabs rattled ther way round London and other cities for years,covering millions of miles. Even that couldn't kill them off but these icons,so beloved on Londoners and tourists alike were finally finished off in London on what now seems somewhat dubious 'eco' grounds. A few still work for hire earning their owners a living in other towns and cities but more are in the hands of private owners who enjoy driving these vehicles,finding that they are ideal for large families and versatile work horses .
My first fairway,a rusty and bodged ex London taxi cab was bought,sight unseen on ebay (never again!) It had tons of pudding slapped over doors,wings and underneath,quite why I bought it is beyond me.A fairway driver it had disc brakes,was blue with a grotty vinyl roof hiding rust .It had all the 'normal' fairway faults,leaking windscreen ,dodgy electrics,wings and doors as rotten as pears .
Finally the gearbox failed and I bought another taxi for spares. I decided it was a better bet and became my second and current taxi,I have started a page about it here.
Built by LTI (Carbodies) these cabs have door locks that operate as you drive off,an ancient body design with seperate bolt on wings,sills and other body panels with built in rust traps. They have an automatic gearbox with an 'overdrive' ,the bullet proof 2.7 litre Nissan diesel engine that can clock up over half a million miles and more character than their plastic,modern replacements . The rear passenger compartment is as big as some vans,a partition seperates drivers from passengers and the rear doors open extra wide for excellent wheel chair access. My original fairway covered over 400,00 miles and never failed to get me home until its gearbox finally died.
|
|
|
|
|
|
|
|
|
|
|
|
|
|
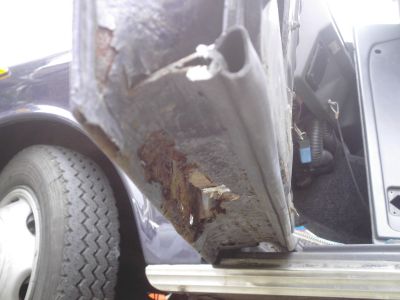
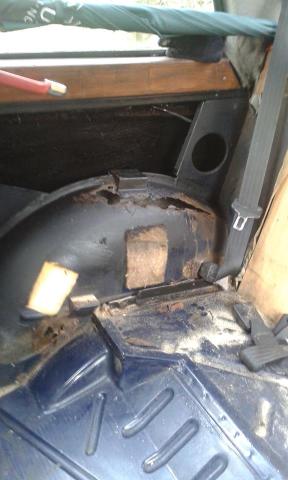
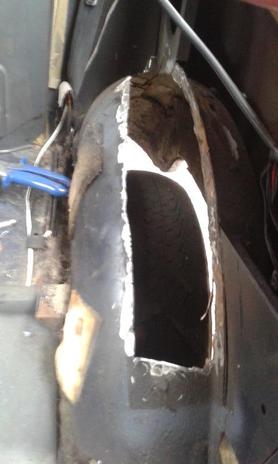
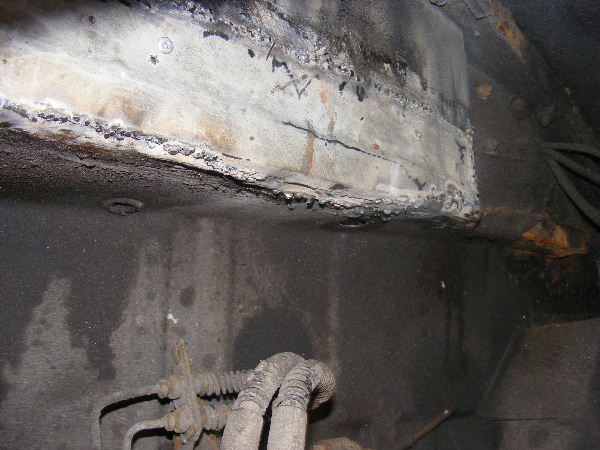
The inner rear wheel arches were also rotten. These needed large patches welded in along the top. I also cut out the seat belt mounts and used the remains of the old reinforcements to make larger and stronger ones bolted and welded in place. |
|
Both sides needed a lot of loose rusty material removed to get back to sound metal.The edges were squared off and ground down to remove paint etc.I used thin (1mm) Cutting discs in an angle grinder. The metal welded in was thicker than original and galvanised.Galvanised steel can give off quite dangerous fumes when welded .The welding was done outside with the doors open and I wore a proper respirator. |
|
|
|
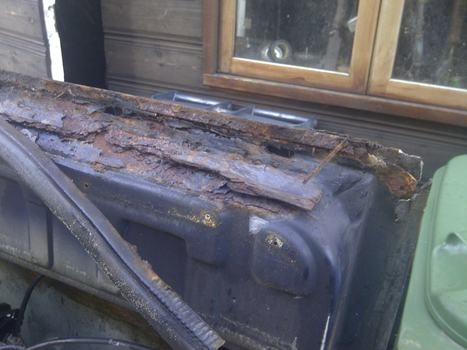
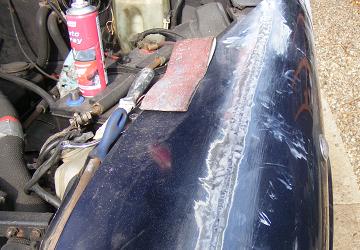
.Hopeless water sealing arrangements and a rubber seal that seems designed to trap water under the door means the all the door bottoms had rotted badly.This is one of the rear doors. |
|
|
An angle grinder on the door sides removed lumps of filler.rust and paint and revealed this damage to the door side. |
|
|
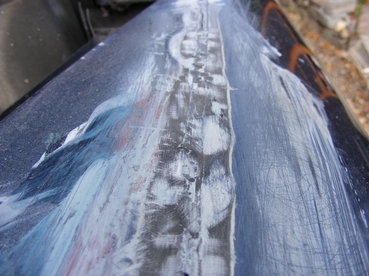
Door skins aren't available so it's a case of cutting and butt welding in some steel on the outside of the door.On the inside some more steel was used to patch up the rotted out frame at the back. |
|
|
It's not a permanent job but the door looks a bit better with some new steel welded in place and with some more grinding it will be ready to be given a skim of filler. |
|
|
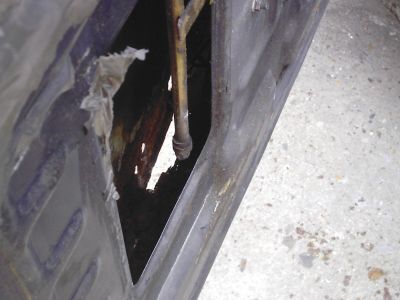
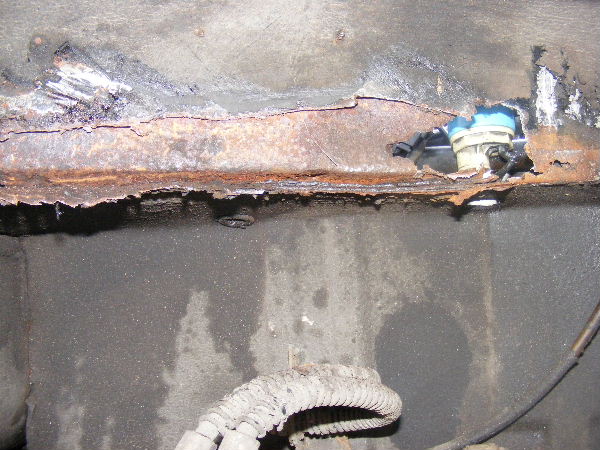
Repairs to rusted out inner wings.
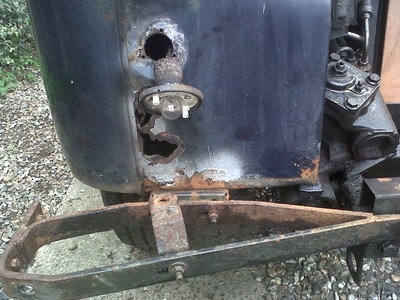
The same horrible mastic had been used to cover an old welded repair to the inner wing.I bought two more fairways,both had serious corrosion probles on the inner wings as well. Although the taxi has a seperate chassis,rust close to a suspension mounting must weaken the structure to some degree.The diesel filter is clearly visible through the hole at the front.
|
|
|
A plate welded in,the plate has a groove hammered in it along its full length to give it a bit of extra strength and better to resist flexing.It was difficult to weld neatly due to space restriction with the outer wing still fitted. |
|
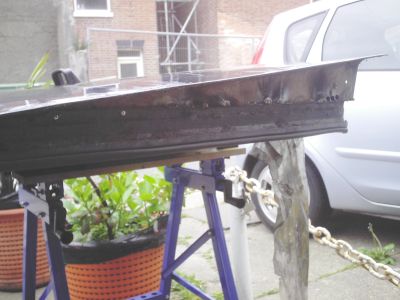
Flapping wings,cleared for take off. The wings bounced up and down on anything other than a smooth road. This weakness seems a feature of many of these cabs. I added a couple of heavy angle iron braces from the upper mounts inside the inner wing to the outer mounts on the bumper.When fitted they were under slight tension and immediately stopped the wings jumping up and down.The whole vehicle felt much more solid as a result of these simple brackets.The wings are quite thin steel and rust soon weakens them further,placing a hand on the inside of each and trying to push them apart revealed considerable movement. |
|
|
The wing channel had also rusted and split.It was easy enough to cut away with an angle grinder and removing the fixing bolts meant the rotted section could be removed and a new bit fitted without having to remove the wing. When using a mig or other electric welder it makes sense to remove the battery leads and disconnect the alternator to prevent stray surge currents damaging the charging system. Before starting any repairs to the bodywork it is a good idea to see what parts if any are available new,many of the body panels are either no longer made or very expensive,some others are of dubious quality.. |
|
|
|
The seam where inner and outer wings bolt together,is covered by a plastic strip,water collects in the gap and starts the wings rusting.The fixings are coarse threaded self tappers with hexagonal heads and the whole assembly is weak even when new. The wings might be quick and easy to replace but new ones are no longer available in steel. I removed the fixings and plastic strip and made a new centre part from steel. This was inserted between the wing halves and the fixings tightened back up. |
|
The join between inner and outer wings was welded with the new centre section providing a seal and strength along the join. The welds were small,about an inch apart and stitched the outer,inner wings and central strip together. |
|
|
|
Grinding the welds flush meant they needed little filler .The wings are now much more solid and no longer bounce up and down on pot holes etc. |
|
I welded the front of the wings where they are bolted via a bracket to the bumper.Bolt on wings might speed repairs but they are not very rigid and there are a lot of traps for mud,salt and water to collect and rot out the wings from underneath..The bumper bracket is thick steel but relies on just two bolts to attach to the chassis,it flexes up and down with the weight of the bumper. |
|
|
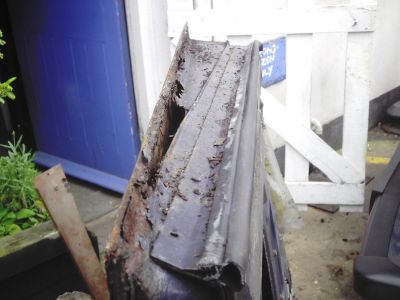
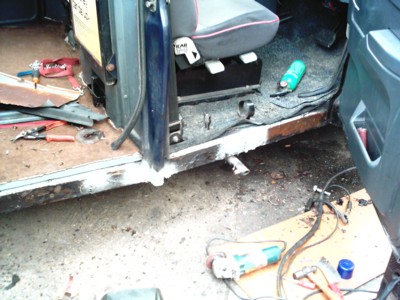
New bolt on sills replace the rotten ones..
|
|
|
|
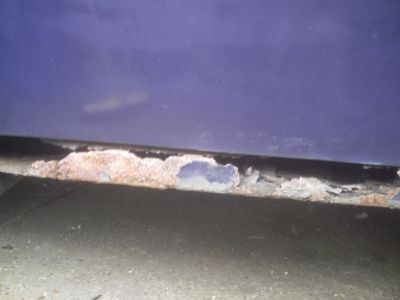
Removing what was left of the outer sills revealed. plenty of rust and a couple of old patched repairs.The old sills were full of enough damp mud to fill a bucket.The bottom of the door post needed a welded repair and a couple of weak bits on the inner sill were cut out and plated then painted in a zinc rich primer and then a bitumen based underseal.. |
|
|
The new sills fitted just as badly as the originals . There were large gaps with the old sills where they go round the door post and the gap with the new sills on this trial fitting were even worse. I made up some steel sections to reduce the gap,these were welded to the sills and then sealed to the door post with a silicone like compound. It's hardly suprising they fill with muck and water and rot quickly. |
|
|
Looking right at the front of the old sill there was a 1/4 inch gap between it and the A post.I made up some more small steel sections to reduce the size of the gaps and then pumped in a silicone sealer to make the join waterproof.When the sills were finally fitted Waxoyl was used inside them. |
|
The power steering box on a fairway taxi (which is apparently the same as some land rovers).is a common source of fluid leaks. The steering box is bolted to the chassis by four bolts secured by locking tabs,the box can be removed complete with the arm if these,the pipes,steering column UJ bolt and the nuts securing the track arms are removed.The steering box drops out underneath. A large nut on the bottom holds the steering arm (which is usually very tight) Under the dust cover is a large circlip this is removed.A small hole can be drilled into the steel body of the seal held in by the circlip,and a self tapper screwed in which can be pulled with pliers to dislodge the seal.The next seal is rubber and can be removed with a small sharp screwdriver.The new seals are fitted,smeared with petroleum jelly (Vaseline). On this vehicle the seals were damaged and the circlip broken off so the repair took a few hours. |
|
|
|
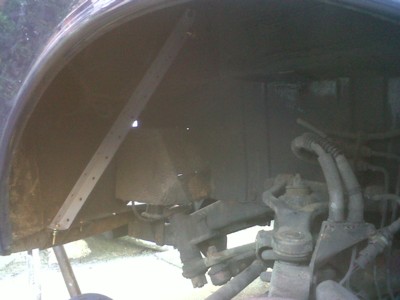
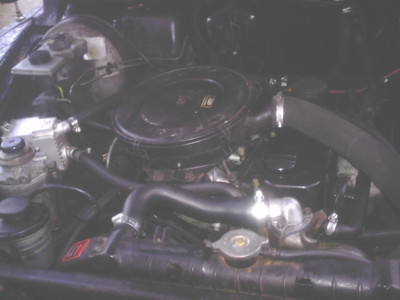
With the large opening bonnet.access to the engine is pretty good. |
|
The starter was changed for a new higher powered version when the original started playing up. This is the view with the starter removed. It comes out from underneath,held by two 14mm headed bolts which need a swivel type socket to get to.With the manifold and air cleaner removed access to the connections on the starter are easier to get at. |
|
|
|
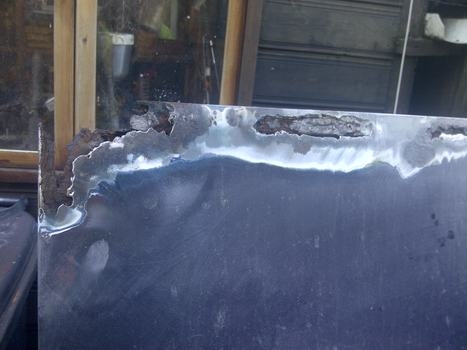
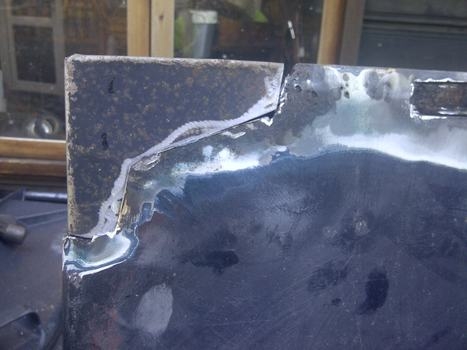
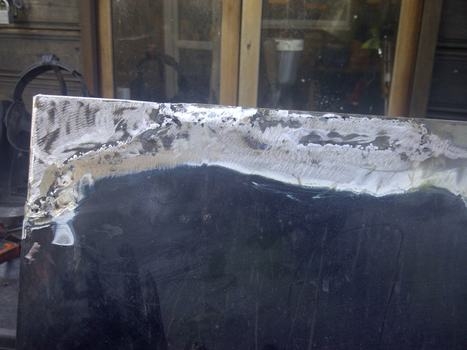
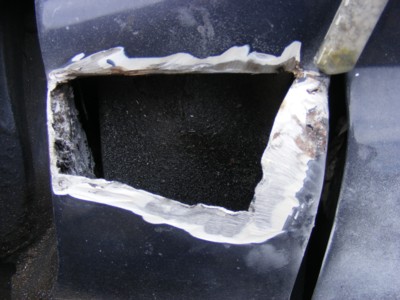
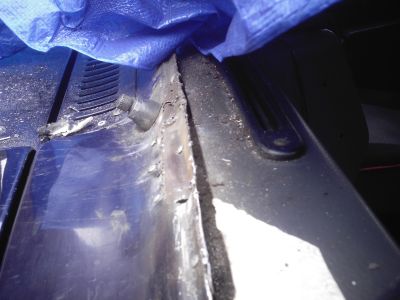
Both the screen pillars were rusted through from the inside. The rust holes were cut out and then taken back to sound metal and the edges squared off. These are 'sealed' sections and there is no access to them from behind so the repairs had to be carried out from the outside |
|
|
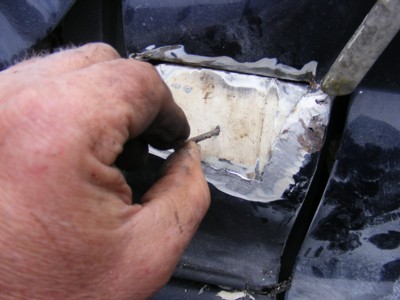
A piece of galvanised metal was cut fractionally larger than the hole,curved to the shape and after the edges were cleaned up with an angle grinder it was held in place behind the hole with a nail tacked on in the centre. |
|
|
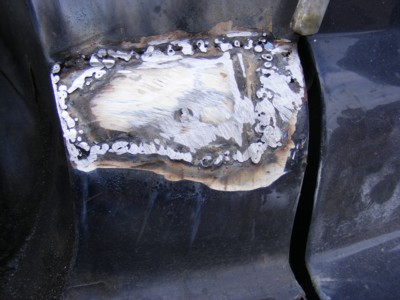
The plate was tacked in place with short welds ,the welds ground down and then more tacks added between the existing ones (top) these were then joined together to make a continuous run.(bottom left) then the whole lot were ground flush Galvanised steel doesn't give a neat weld and the fumes are dangerous,it does however give some protection from corrosion. |
|
|
|
|
|
|
|
|
|
|
|
|
|
|
Taxi chrome bumpers. |
|
|
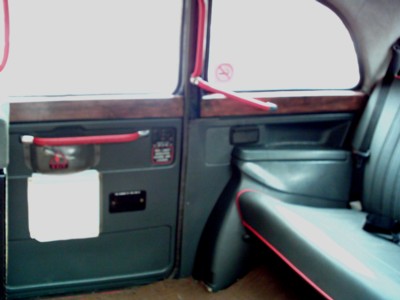
Wood door cappings for the interior. The taxi was originally painted inside.All that bare paint work reminded me far too much of an old mini van |
|
|
I made up some wooden trims and stained them,some better equipped models of the Fairway had these as standard. . |
|
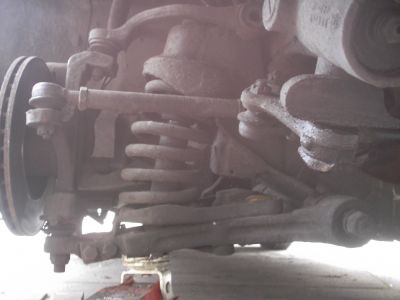
Fairway front suspension The front suspension on these is a conventional double wishbone arrangement. The front suspension was designed specifically for these taxis.This is a 1993 Carbodies taxi cab so it has front brakes with vented discs,earlier versions of the fairway and the FX4 taxis had drums on the front and most taxi drivers agree the disc set up is much better,the drum brakes grab and make slow speed braking harsh.. |
|
|
|
|
|
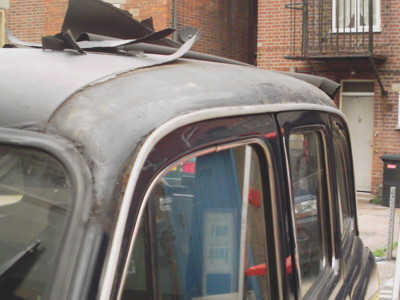
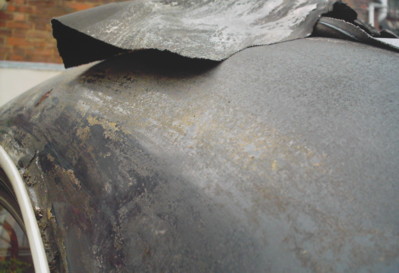
The vinyl roof heads for the wheely bin. The vinyl roof was a bit tatty and coming unglued near the gutters.The vinyl had gone hard and it had been repaired and restuck a time or two in the past. Peeling off the old covering was easy,it seemed the paint on the roof had hardly been rubbed down and there wasn't much glue holding it on either. The vinyl was pulled out from under the window rubbers front and back |
|
|
|
The glue left behind from the vinyl roof took a long while to shift using turps and a nylon scourer.Rubbing down compound and T cut eventually got a shine on the roof,some touching in was needed where the paint had lifted. |
|
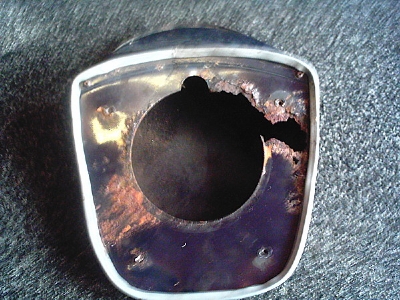
The rubber seal around the roof mounted illuminated "Taxi" sign was perished.When I put my hand up inside it I could feel great lumps of flaky rusted metal and at first thought the roof had rusted badly .Removing the sign revealed it had rusted but the roof was OK.I welded new metal to the underside of the sign and drilled out the broken off screws and retapped the holes.I made a new rubber seal and used a non setting black mastic to try and guarantee a waterproof join to the roof. |
|
|
Reparing the boot channel.
The boot seals weren't actually sealing anything and water was finding its way into the boot.Removing the rubber and yet more dollops of manky sealing compound revealed the channel was rotten and had been poorly welded.Two lengths of steel were bent into shape and welded in place.The rubber was refitted and the seal tested with buckets of water.The boot light switch is a poor design and tries to peel back the rubber seal every time the boot is opened,a metal shield was fitted over it to prevent the switch catching on it.
|
|
|
|
Webasto block heater. I fitted a Webasto engine pre heater under the bonnet on the inner wing panel between the fuel filter and servo.Fairway taxis have a seperate rear heater and I plumbed it into this.Even with outside temperatures below freezing,ten minutes or so plugged into the mains and the heater in the back is warm and the Nissan diesel starts first turn of the key |
|
|
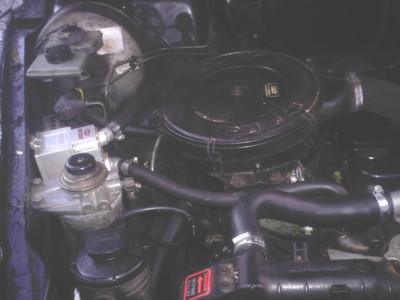
The engine in a fairway is a low revving 2.7 litre normally aspirated Nissan diesel.To save gassing polar bears later ones are fitted with turbos and catalytic convertors.The engines are renowned for achieving high mileages 300,000 miles isn't regarded as excessive.The vast majority are automatic but there are some manual versions with five speed gearboxes.The brake servo is driven by a pump on the rear of the alternator,if the alternator belt breakes it causes the engine to lose oil and ther vehicle shouldn't be driven.On the opposite side of the engine is a pump for the power steering driven by a seperate belt |
|
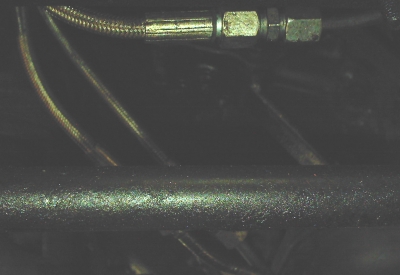
One problem was the rubber pipes connecting the steel pipes from the automatic gearbox to the cooler at the base of the radiator leaking fluid.They had gone hard,probably due to heat and started to crack. The unions in the bottom of the radiator proved impossible to remove and looked like they would tear out of the thin metal of the radiator. Removing the rubber pipes,using a pipe cutter in situ to cut the metal pipes and using compression fittings on the 6mm diameter stubs to replace the rubber sections with teflon lined braided hydraulic high pressure hose was a permanent cure. When the radiator later sprung a leak I found there are two types and mine was the early one which is no longer available.As a result I had to make and fit new flexible ended pipes. |
|
|
|
These home built wooden car ramps were made from eight inch by two inch planks laid one on top of the other,the stops are heavy angle iron.The ramps are very heavy which stops them sliding away as a vehicle mounts them.The timber is in compression and they are enormously strong,much stronger than some light and badly welded iron ones I have seen |
|
People often smile at what must be one of the most recognisable vehicles in the world and contrary to the warnings I was given,I've never had a drunk try and climb aboard on a Saturday night.After years of messing about with old cars and vans I can normally source spares cheaply,and these are rather like a glorified kit car or meccano set,everything from the wings to sills are bolted on and they are suprisingly easy to work on for routine servicing.London taxis are full of odd design features like wooden floors in the rear that are removable to check the condition of the chassis. The chassis itself is strong,made of heavy gauge steel and contributes to the weight of these taxi cabs.Its possible to work on the exhaust sitting inside in the dry and warm by simply lifting out a floor board. |
|
|
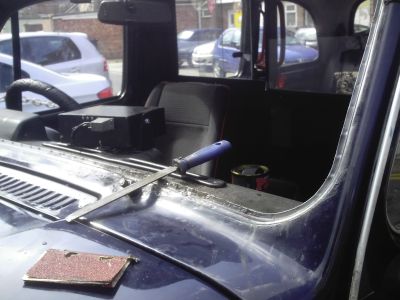
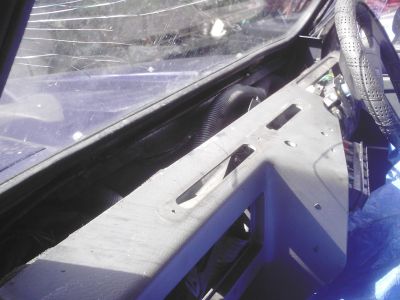
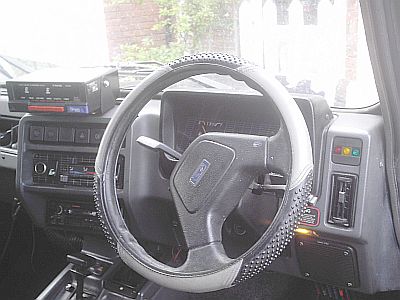
On top of the dash is an old taximeter I fitted,underneath are various light switches and the controls for a pretty dismal heater.Under that is a radio.The speedo binnacle is I believe the same as a Sherpa or Maestro and the mileometer itself keeps jamming (a common fault apparently) I suppose the Sherpa and Maestro never get to the dizzy realms of all those zeros.Everything is screwed together and absurdly easy to take apart.As with most small manufacturers Carbodies or LTI as they are now known,raid the parts bins of other makers for all sorts of stuff on their vehicles.The door handles and catches are Ford for instance. The interior consists of mainly plastic mouldings secured with self tapping screws.A few hours spent checking these are tight and placing stick on foam (draught excluder strip) behind loose or rattling panels makes the interior a quieter place to be.The front wings are held in place with larger self tapping screws, and repairing loose or broken wing fixings (especially the ones at the bottom of the wings where they bolt to the sills) stops the wings shuddering when going over potholes. |
|
|
The automatic gearbox. The gearbox fitted to automatic fairways is a Jatco E4N71B,four speed auto with a torque convertor lock.The same box is fitted to some other japanese vehicles.It uses Dexron 2 fluid,the level is read on a dipstick with the engine running and the lever in park.Dexron 2 is pretty much obsolete,the newer Dexron 3 is suitable,the gearbox can be partially drained by removing the 19mm plug in the transmission pan. This was the filthy transmission fluid drained from this taxi when I first bought it,even though the fluid on the dip stick looked quite clean.The gearbox failed after a few years. |
|
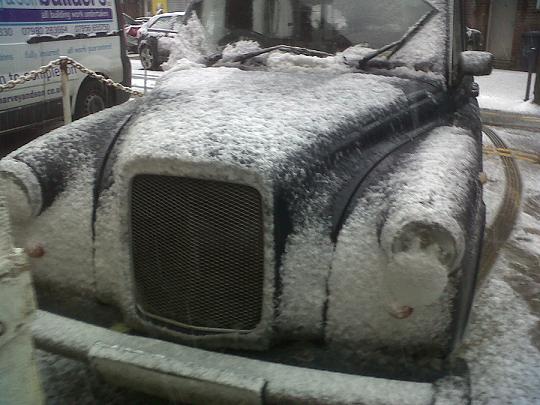
A large and well charged battery is needed to fire any diesel engine in sub zero weather.
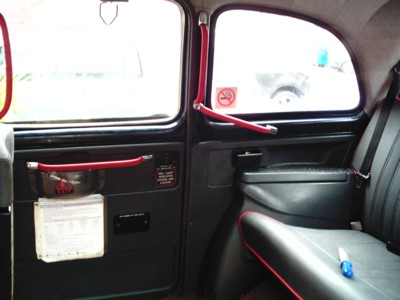
Driving one of these as private transport is fun.The design of the traditional london black cab is donkeys years old,its all a bit agricultural inside but once you're rolling its reasonably light to drive with the power steering,automatic box and servo brakes.The rear passengers have loads of room and are fascinated by the flashing lights and clicking of the door locks.
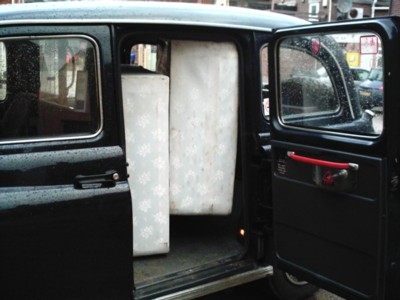
The boot is small and dominated by the large heavy spare wheel but I've carried wooden pallets and a tumble drier in the back and it's said you can get an upright piano inside.It will carry an eight foot length of timber if its poked through the partition and a four foot by four foot sheet of ply.The doors open very wide and like most taxis this one arrived with ramps for loading a wheel chair.For someone who has a disabled passenger these taxis are ideal and they can carry a wheel chair and three other occupants in the back.
These taxis are also very strong with their seperate chassis and are also quite heavy.They are considered a safe vehicle for passengers.
The rear doors on a taxi will automatically lock when the vehicle is travelling at anything over a crawl and when stationary if the foot brake is applied.This avoids passengers running off without paying their fare and is a good safety feature if children are in the car.The windows slide up and down,there are no window winder handles.The rear seat tips up to increase the load space in the rear and the two rear facing seats have flip up seat bottoms much like the old cinema seats.
The body design and construction of the fairway taxi is very similar to the old Austin FX4.Mechanially they are very different.Various engines have been fitted to these over the years from 2.2 leyland diesels to Land Rover units.The brakes were originally drums,later servo assisted on the front which caused some problems with harsh slow speed braking.Most surviving fairways now disc front,drum rear and servo assistance all round..The engine is the Nissan 2.7 diesel normally coupled to an auto box although there are manual fairway taxis. The engine and gearbox were fitted to a few Nissan models and the gearbox was also employed on other japanese cars.Despite the basic design being very old,the fairways use metric fastenings.
The Cab and driving controls,
To the right of the steering wheel are three lights.The red one is a warning light for the fuel filter water trap,if it glows water has built up in the filter.This has to be drained off as water can damage the engine,the injectors and pump.If you feel under the bottom of the fuel filter there is a plastic tap with a pipe coming out of it screwed into the base.Undoing this a couple of turns lets the water and some fuel flow out.Alternatively you can remove the two 13mm bolts holding the filter unit to the inner wing,disconnect the fuel lines and electric plug and holding the unit upright drain it into a jar on the bench.The fuel system will then need bleeding (see below).
The green light is the high/low gear light.Pressing a switch by the gear selector turns the green light off and engages a sort of overdrive which drops the revs and makes motorways a lot more relaxed.The light should be on (lower gearing) for town use.
The orange light goes out when the glow plugs have heated enough to start the engine from cold.A second or so later the relay will disconnect with an audible click.The light and relay will stay on for a shorter time if the key is turned back on again after a failed go at starting.
An odd point is that the cabs should not be driven for any distance with the charging warning light on,this is because the fan belt drives a pump on the back of the alternator which operates various servos in the automatic gearbox.
Cold starting. When cold weather sets in starting any older diesel gets harder.Diesels need to heat to fire and this has to be generated by the compression in the cylinders,and any heat generated is quickly dissipated by a cold engine.A very worn engine may not be able to generate enough compression to fire the diesel/air mixture,sometimes an ether based spray is used as this burns at a lower temperature but incorrect use can result in a violent explosion inside the cylinders (diesel knock) and as the engine wers further and more compression is lost eventually even this will not allow the engine to fire and run.
The fairways have an odd glow plug system.When the ignition is first turned on the orange light glows and full power is supplied to the glow plugs.After a few seconds the light goes out and after a few more seconds reduced current is supplied to them via a resistor located in the inlet manifold and a second relay.The relays for this are under the bonnet on the bulkhead on the passengers side of the heater .The injection timing point is also advanced whilst the engine is cold..
Hi power starters. I fitted a starter rewound to provide more turning power (torque) this turns the engine considerably faster than the old unit and the engine fires almost instantly (in warm weather). The starters are reasonably easy to change ,the inlet manifold can be removed for better access but a decent set of sockets with extensions and UJs are handy.The starter motor bolts are 14mm the top one is the hardest to get to and should really be removed first.
The Alternator.The alternator has an air pump on the back of it to power the brake servo and gearbox servos. If the fan belt breaks it will stop charging but the engine will also lose oil.The taxi must not be driven for any distance with the fan belt loose or missing.
The battery. Fairway taxis have a large commercial type battery fitted to the o/s under the bonnet. The battery is a type 664 or similar.Around 110 A.H and with a CCA (Cold Cranking Amperage) of around 680 or more.
Bleeding the fuel system.After renewing the filter,working on the fuel system or draining water from the filter housing the diesel system will need bleeding.Removing the outlet pump from the filter and pushing the plunger up and down should expel air,continue untill a flow of clean air free diesel emerges.If after bleeding the engine doesn't rev a second attempt maybe needed.If the engine still runs roughly cracking off the injector unions and cranking the engine untill diesel comes out should clear the last air from the injection pump.
Heater plugs. These are wired so that the failure of one means the others carry on working, each is fed by 12 volts.Taking them out (12mm deep socket) and using jump leads or heavy cable to put 12 volts through them should make them glow white hot after just a couple of seconds,if they don't they need replacing.The injectors need a 22mm deep socket attached to each is a metal spill pipe to return excess fuel,this can crack if the injectors start to turn when undoing the pipes fixing nuts (19mm) leaving a diesel leak.
Valve clearances. These valve gaps (tappets) are 14 thou hot.Inlet and exhaust are the same.Get the engine hot and take out the heater plugs,turn the engine with a 19mm spanner on the power steering pulley.With Number one at TDC on firing stroke set valves 1,2,3 and 6.With number 4 at TDC on the firing stroke.set valves number 4,5,7 and 8.Turning the engine till the inlet has opened will determine the firing stroke,placing a finger over the heater plug hole will confirm the piston is rising on the compression stroke.
Headlamps. The dim dip system stopped working,which meant the dipped beam was very dim with the ignition on.Behind the glove box are two relays,one blue for the heated rear window delay and a pink one for the dim dip lights.By taking the relay apart and holding the contacts open the lights worked (bypassing the dim dip) so I fixed the contacts open temporarily,which probably means it will stay like that.As far as I'm aware the dim dip system is no longer a legal requirement in the UK.
The rear heater. .The rear passengers in a fairway have their own seperate heater fed by hot water from the engine cooling system and with a couple of switches set into the partition,another switch on the dash overides these.The heater itself is situated just behind the drivers seat.
The front heater The front interior heater in a fairway is the same as fitted to an MGB (and they weren't a lot of good in them either). A cable operated tap is fitted in the water pipe just above the exhaust manifold to vary the volume of hot water going to the heater.. The heater motor is a generic Lucas one In theory you can unclip the front of the heater to get at the heater rad,in practice you have to remove the whole unit.There are two bolts either side of the heater,one at the top and four inside holding the flap housing.Foam type gaskets are used,these dry out and crumble letting air leak in and out.
Wipers.The wiper motors are often worn out because of the high mileages these things clock up but the wiper motor is a standard three brush Lucas.The brushes can be bought cheaply and changing them doesn't require any soldering.Turning the wheel boxes and the inner rack round so that they then operate on unworn sections might give them another leases of life.
Windows. The fairways have one electric window on the passengers side front,the others slide up and down with a spring inside the door holding them in their opened position.Internal window catches stop the windows being operated by light fingered gentlemen from outside.These catches often break and most used fairway taxis have a collection of the broken ends of the catches rattling away in the bottom of the doors.
The Engine. The low revving Nissan 2.7 diesel engine was fitted to other vehicles in the Nissan range (the Terranno for example) and the newer TX1 taxis.Asking for engine parts for a fairway at a motor factors doesn't usually get as helpfull response as asking for Terranno parts.The engine holds just over a gallon of 30 SAE oil,the sump plug is 22mm and sits in the middle of the sump.
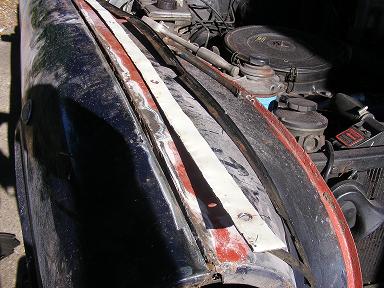
Bodywork. The wings and sills all bolt on with hex headed coarse threaded screws and a few ordinary nuts and bolts.The front outer wings bolt to a bar running across the front on which the bumper is also hung,if its loose or the brackets are rusty the wings can bounce up and down alarmingly when you hit a bump in the road and at night the beams can be seen dancing about on the road surface.I made up some struts from angle iron under each wing,running from the top inner wing mounting bolts either side of the radiator mount to the outer mounts holding the wing to the bumper.The wing shaking although not eliminated entirely was drastically reduced and the taxi feels much happier on a bumpy road.
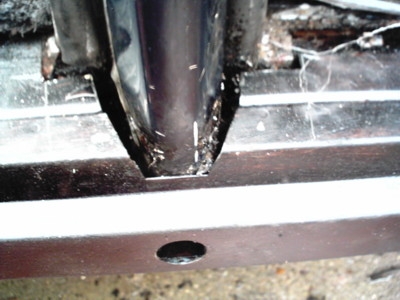
Behind a splash shield under each front wing is a drain tube,if this is blocked or broken water will collect in the sills and the base of the wings rotting them out rapidly from the inside.The tops of the tubes are visible at the rear of the wing channels where they meet the bulkhead.
Tyres. London taxi tyres are 175 R 16,an odd size but easily obtainable.They are not very expensive as remoulds.The tyres are marked 'taxi' to show they are made to cope with the weight etc of a black cab and are of a constant diameter so thet the taxi meter readings are accurate. To change the rear wheels you can't simply jack under the axle,to let the rear wings clear the tyres the springs have to drop a bit,so you also need to raise the body,or place a trolley jack under the front shackle..The later LT series cabs use the same size tyres so tyre supplies should be OK for a good few years yet.
Brakes.The front are conventional disc (drum on early models) .The disc brakes are considered much superior to the earlier drum brakes which are said to snatch badly.Anyone used to older transit rear brakes with trailing and leading shoes of different thicknesses will feel at home when working on the fairways rear drum brakes.I found the rear brakes have a tendency to stick on if the vehicle is stood for some time.The brakes are servo assisted,the servo vacuum being provided by a belt driven pump,diesel engines do not have the same manifold vacuum as petrol engines so a seperate vacuum pump is used..
MOT test.If the taxi is being used as a private vehicle the MOT test is as for a normal car.The garage might have problems finding 'Fairway Taxi' on the DVLA computerised system,if so advise then to try FX4 instead.The MOT for a fare carrying taxi is very strict,so one that has just been taken out of service as a taxi should go through a conventional MOT with no problems.
The electrics. Relays all over the place,and plenty of wires to fiddle with.Always disconnect the battery and alternator when arc or mig welding.Most electrical problems are caused by dirty or insecure connections.As panels are bolted on rather than welded bad earths can cause problems especially on lights and indicators. The battery is a bit of a monster ( see above).I had problems starting in the cold weather a couple of times and found the earth strap connection to the engines was poor,making up a direct connection from the engine block to the battery negative terminal helped and I have had no problems since.
As a work horse these old taxis come in handy for all sorts of jobs.I managed to get a divan bed in for its last journey to the recycling centre.Imagine trying to do that with a modern saloon car.I've also carried eight foot lengths of 4x4 wooden poles,feeding them into the back through the sliding glass door in the partition.
Diesel additives. An experiment. Some years ago I read on various forums reports of owners who had tried adding two stroke oil to diesel fuel for older engines on the grounds that it made up for the reduced sulphur levels in newer fuels.This was said to provide an increased level of lubrication that the older engines needed.I tried Redex 0-60 cetane booster and thought the engine ran quieter but the gains were slight enough not to warrant the extra price.I then tried a low ash two stroke oil in the ratio 50 to 1.There was a definite reduction in diesel knock,most noticeable with a cold engine.The engine didn't seem to develop any more power but was quiet enough that lower speed changes into 'overdrive' were very difficult to hear,so much so that I at one time thought the lock up in the auto box had failed..I have now used the two stroke oil as an additive in this engine for tens of thousands of miles with no ill effects. The engine is quieter and smoother with the oil performance is if anything improved.I have reports from other drivers of older diesels who report the same benefits. However,you try this at your own risk.
I now have a Rover P5B V8 coupe and am carrying out a rolling restoration.There is a page about it here .
Spare parts,forums and blog pages etc all connected with London type taxis.
Taxi drivers online is a mine of information from taxi drivers and owners.
The taxi drivers forum features chat,advice and lots of stuff from taxi drivers..
TS factors. Based in Liverpool these have a lot of new spares and servicing parts listed for older taxis.
S.P.R. SPR taxi parts.These list some fairway,TX1 and TX2 parts.
Gawith taxi spares. Lists spares for fairways and TX series. Also gives a phone number for secondhand parts etc.
Taxi part shop. This link takes you to the fairway section,lots of servicing and repair parts available.
London taxi classics.A site based in Holland but loads of usefull links and downloads for Fairway and FX4 drivers handbooks.
A London taxi as a daily driver blog,another taxi having a second lease of life as a run around.
Story of the FX4 and Fairway. History of these cabs,dates and development,an interesting taxi information site.
Elite Taxis Export and UK sales of older taxis.Spare parts servicing and repair parts.
Yeah pimp my ride baby (temporarily anyway) !.I added a set of chrome effect hub caps,you can't beat a bit of bling,I added some chrome bumpers later,but the chrome on both bumpers and hub caps is hopeless,good for a few days but in reality,a waste of money.